前景概要:
上一篇文章我们安装完Wordpress,基本上也就知道一个简单的网站的发布流程,这一篇就开始部署Nextcloud,打造你的第一个私人网盘。
为什么推荐Nextcloud?
- 免费
- 部署简单
- 功能齐全,网页以及app都完美支持
Nextcloud安装最难的点就是网站配置,如果没有根据官网的配置文件的话,就可能会有如下问题:
- 安装时报错,导致连接不上数据库,无法访问页面
- 即使安装完,在
设置–概览界面,出现很多条警告
开始部署
第一步:上传Nextcloud程序到网站目录
这边以 /var/www/nextcloud 目录为例
方法1:本地下载后通过SSH软件上传到服务器
方法2:直接使用命令
1 2 3 4 |
wget https://download.nextcloud.com/server/releases/latest.zip mv latest.zip /var/www cd /var/www unzip latest.zip |
添加访问权限:
1 2 |
chown -R www-data:www-data /var/www/nextcloud chmod -R 755 /var/www/nextcloud |
第二步:网站配置
这边把它的登录入口定义为: cloud.example.com
有些环境需要在
fpm/php.ini(比如php8.1的路径为:/etc/php/8.1/fpm/php.ini)配置文件中修改pathinfo:(大多数情况不需要)
1;cgi.fix_pathinfo = 1 #去掉注释
直接在 /etc/nginx/sites-enable/ 目录下新建一个 nextcloud.conf 的配置文件:
1
|
vim /etc/nginx/sites-enable/nextcloud.conf
|
贴入以下官方文档给出的配置文件:
1 2 3 4 5 6 7 8 9 10 11 12 13 14 15 16 17 18 19 20 21 22 23 24 25 26 27 28 29 30 31 32 33 34 35 36 37 38 39 40 41 42 43 44 45 46 47 48 49 50 51 52 53 54 55 56 57 58 59 60 61 62 63 64 65 66 67 68 69 70 71 72 73 74 75 76 77 78 79 80 81 82 83 84 85 86 87 88 89 90 91 92 93 94 95 96 97 98 99 100 101 102 103 104 105 106 107 108 109 110 111 112 113 114 115 116 117 118 119 120 121 122 123 124 125 126 127 128 129 130 131 132 133 134 135 136 137 138 139 140 141 142 143 144 145 146 147 148 149 150 151 152 153 154 155 156 157 158 159 160 161 162 163 164 165 166 167 168 169 170 171 172 173 174 175 176 177 178 179 180 181 182 183 |
upstream php-handler { server 127.0.0.1:9000; #server unix:/var/run/php/php7.4-fpm.sock; } # Set the `immutable` cache control options only for assets with a cache busting `v` argument map $arg_v $asset_immutable { "" ""; default "immutable"; } server { listen 80; listen [::]:80; server_name cloud.example.com; # Prevent nginx HTTP Server Detection server_tokens off; # Enforce HTTPS return 301 https://$server_name$request_uri; } server { listen 443 ssl http2; listen [::]:443 ssl http2; server_name cloud.example.com; # Path to the root of your installation root /var/www/nextcloud; # Use Mozilla's guidelines for SSL/TLS settings # https://mozilla.github.io/server-side-tls/ssl-config-generator/ ssl_certificate /etc/ssl/nginx/cloud.example.com.crt; ssl_certificate_key /etc/ssl/nginx/cloud.example.com.key; # Prevent nginx HTTP Server Detection server_tokens off; # HSTS settings # WARNING: Only add the preload option once you read about # the consequences in https://hstspreload.org/. This option # will add the domain to a hardcoded list that is shipped # in all major browsers and getting removed from this list # could take several months. #add_header Strict-Transport-Security "max-age=15768000; includeSubDomains; preload" always; # set max upload size and increase upload timeout: client_max_body_size 512M; client_body_timeout 300s; fastcgi_buffers 64 4K; # Enable gzip but do not remove ETag headers gzip on; gzip_vary on; gzip_comp_level 4; gzip_min_length 256; gzip_proxied expired no-cache no-store private no_last_modified no_etag auth; gzip_types application/atom+xml application/javascript application/json application/ld+json application/manifest+json application/rss+xml application/vnd.geo+json application/vnd.ms-fontobject application/wasm application/x-font-ttf application/x-web-app-manifest+json application/xhtml+xml application/xml font/opentype image/bmp image/svg+xml image/x-icon text/cache-manifest text/css text/plain text/vcard text/vnd.rim.location.xloc text/vtt text/x-component text/x-cross-domain-policy; # Pagespeed is not supported by Nextcloud, so if your server is built # with the `ngx_pagespeed` module, uncomment this line to disable it. #pagespeed off; # The settings allows you to optimize the HTTP2 bandwitdth. # See https://blog.cloudflare.com/delivering-http-2-upload-speed-improvements/ # for tunning hints client_body_buffer_size 512k; # HTTP response headers borrowed from Nextcloud `.htaccess` add_header Referrer-Policy "no-referrer" always; add_header X-Content-Type-Options "nosniff" always; add_header X-Download-Options "noopen" always; add_header X-Frame-Options "SAMEORIGIN" always; add_header X-Permitted-Cross-Domain-Policies "none" always; add_header X-Robots-Tag "none" always; add_header X-XSS-Protection "1; mode=block" always; # Remove X-Powered-By, which is an information leak fastcgi_hide_header X-Powered-By; # Specify how to handle directories -- specifying `/index.php$request_uri` # here as the fallback means that Nginx always exhibits the desired behaviour # when a client requests a path that corresponds to a directory that exists # on the server. In particular, if that directory contains an index.php file, # that file is correctly served; if it doesn't, then the request is passed to # the front-end controller. This consistent behaviour means that we don't need # to specify custom rules for certain paths (e.g. images and other assets, # `/updater`, `/ocm-provider`, `/ocs-provider`), and thus # `try_files $uri $uri/ /index.php$request_uri` # always provides the desired behaviour. index index.php index.html /index.php$request_uri; # Rule borrowed from `.htaccess` to handle Microsoft DAV clients location = / { if ( $http_user_agent ~ ^DavClnt ) { return 302 /remote.php/webdav/$is_args$args; } } location = /robots.txt { allow all; log_not_found off; access_log off; } # Make a regex exception for `/.well-known` so that clients can still # access it despite the existence of the regex rule # `location ~ /(\.|autotest|...)` which would otherwise handle requests # for `/.well-known`. location ^~ /.well-known { # The rules in this block are an adaptation of the rules # in `.htaccess` that concern `/.well-known`. location = /.well-known/carddav { return 301 /remote.php/dav/; } location = /.well-known/caldav { return 301 /remote.php/dav/; } location /.well-known/acme-challenge { try_files $uri $uri/ =404; } location /.well-known/pki-validation { try_files $uri $uri/ =404; } # Let Nextcloud's API for `/.well-known` URIs handle all other # requests by passing them to the front-end controller. return 301 /index.php$request_uri; } # Rules borrowed from `.htaccess` to hide certain paths from clients location ~ ^/(?:build|tests|config|lib|3rdparty|templates|data)(?:$|/) { return 404; } location ~ ^/(?:\.|autotest|occ|issue|indie|db_|console) { return 404; } # Ensure this block, which passes PHP files to the PHP process, is above the blocks # which handle static assets (as seen below). If this block is not declared first, # then Nginx will encounter an infinite rewriting loop when it prepends `/index.php` # to the URI, resulting in a HTTP 500 error response. location ~ \.php(?:$|/) { # Required for legacy support rewrite ^/(?!index|remote|public|cron|core\/ajax\/update|status|ocs\/v[12]|updater\/.+|oc[ms]-provider\/.+|.+\/richdocumentscode\/proxy) /index.php$request_uri; fastcgi_split_path_info ^(.+?\.php)(/.*)$; set $path_info $fastcgi_path_info; try_files $fastcgi_script_name =404; include fastcgi_params; fastcgi_param SCRIPT_FILENAME $document_root$fastcgi_script_name; fastcgi_param PATH_INFO $path_info; fastcgi_param HTTPS on; fastcgi_param modHeadersAvailable true; # Avoid sending the security headers twice fastcgi_param front_controller_active true; # Enable pretty urls fastcgi_pass php-handler; fastcgi_intercept_errors on; fastcgi_request_buffering off; fastcgi_max_temp_file_size 0; } location ~ \.(?:css|js|svg|gif|png|jpg|ico|wasm|tflite|map)$ { try_files $uri /index.php$request_uri; add_header Cache-Control "public, max-age=15778463, $asset_immutable"; access_log off; # Optional: Don't log access to assets location ~ \.wasm$ { default_type application/wasm; } } location ~ \.woff2?$ { try_files $uri /index.php$request_uri; expires 7d; # Cache-Control policy borrowed from `.htaccess` access_log off; # Optional: Don't log access to assets } # Rule borrowed from `.htaccess` location /remote { return 301 /remote.php$request_uri; } location / { try_files $uri $uri/ /index.php$request_uri; } } |
我们只需查找修改以下内容:
1 2 3 4 |
server_name cloud.example.com; #更改为自己的域名 root /var/www/nextcloud; #更改为你的nextcloud目录 ssl_certificate /etc/ssl/nginx/cloud.example.com.crt; #SSL证书目录,一般放.pem根证书 ssl_certificate_key /etc/ssl/nginx/cloud.example.com.key; #SSL证书目录,.key私钥 |
其他都不需要改。保存退出。
第三步:创建数据库
输入以下命令创建nextcloud数据库:
1 2 3 4 |
mysql use mysql; create database nextcloud; exit |
数据库可以不创建,在程序安装时会自动创建
我的建议也是不用创建,有时候创建后反而容易出现问题
安装Nextcloud
输入你的域名访问,比如:*cloud.example.com* 进入到安装界面。
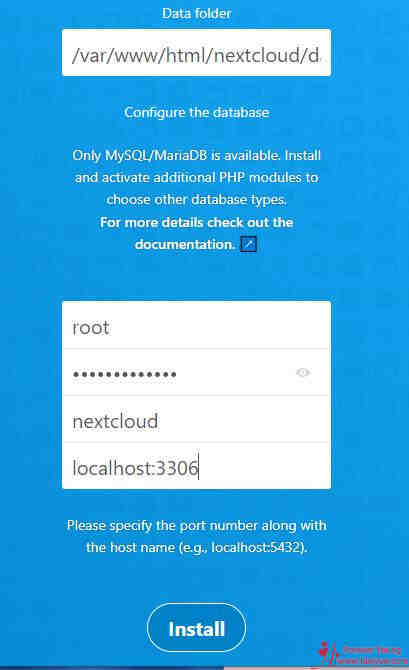
安装前可以确认一下Nextcloud目录权限,没权限的话安装时也会提示“服务器内部错误”
数据库地址这边要加上数据库的端口,比如MySQL默认端口是 3306 。
点击安装即可完成。
至此,NextCloud已经安装完成。
总结
Nextcloud私人网盘已经搭建完成,再回头看看,想想每一个步骤的含义,非常有意义。
声明:本站所有文章,如无特殊说明或标注,均为本站原创发布。任何个人或组织,在未征得本站同意时,禁止复制、盗用、采集、发布本站内容到任何网站、书籍等各类媒体平台。如若本站内容侵犯了原著者的合法权益,可联系我们进行处理。


评论(0)