

- CPU是晶晨S805 ,4核心 1.5GHZ
- 双USB2.0
- 千兆单网口
- 1GB内存+8GB存储
这个配置平平无奇,主要的硬伤是cpu32位的,usb2.0传输速度只有20M/秒左右,下载速度跑不满千兆带宽,好的地方是千兆网口。
「刷机准备工具:」
- WIN10电脑一台
- 双公头USB线一根
- 矿渣玩客云
- 螺丝刀、吹风机
玩客云刷机openwrt两种方法:
「方法一」直刷openwrt 这个网上资源只有一个,snail 大神制作的固件,固件没插件,需要自己安装。
「方法二」刷armbian安装docker在安装openwrt,这个有比较多的适合固件,openwrt版本新,插件多,本次选这个方案。
刷机资源分享
刷机固件、软件,使用阿里云分享,不限速,需要转存后下载,然后解压!
玩客云openwrt刷机包:侧边栏下载
第一步:刷入底包 update
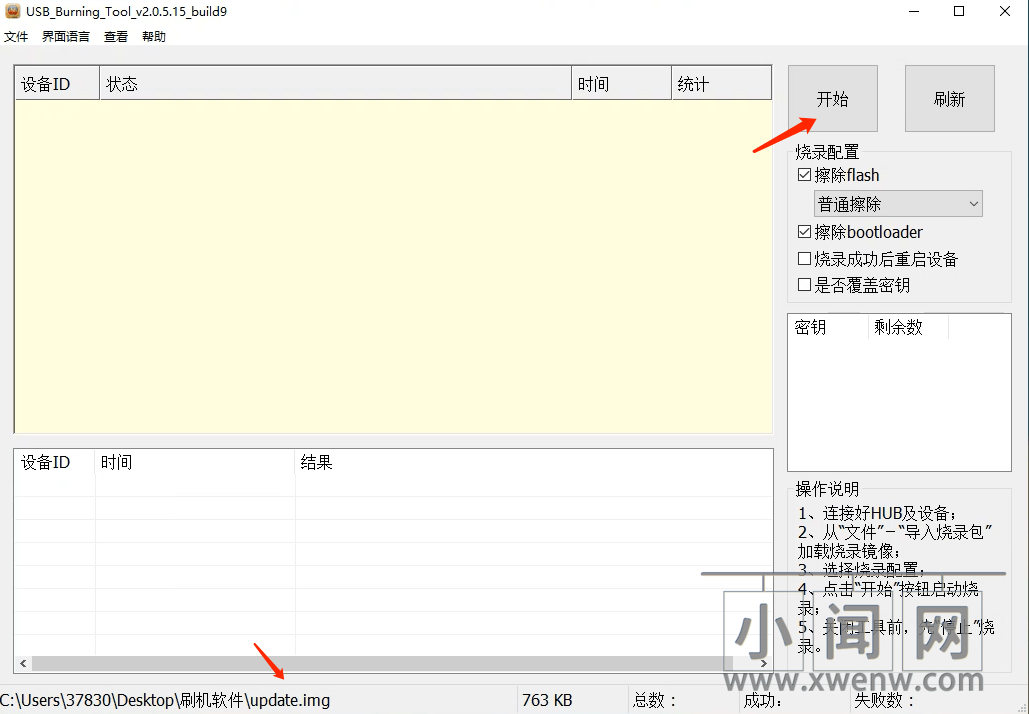
WIN10打开烧录软件,选择update镜像,点开始。关键步骤,先短接触点,再接通玩客云主板电源。需要说明的是,玩客云有两种版本,它们的短接位置也是不一样的。
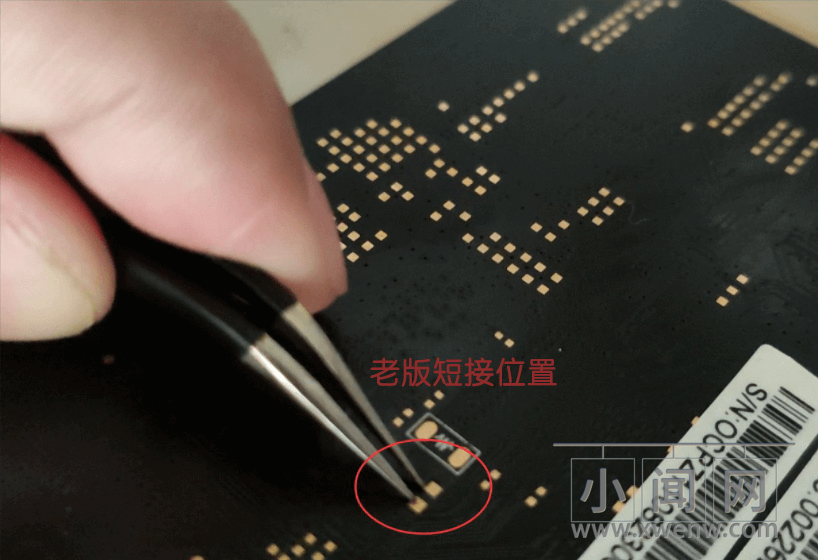
我的是老主板,上图短接位置,图片来源:@Powersee大神

这个是新版(也就是玩客云主板上标注的有v1.3的主板),短接点是在正面。拆机后、usb插入玩客云「靠近HDMI的接口」、另一头接入电脑usb、短接焊点、通电。
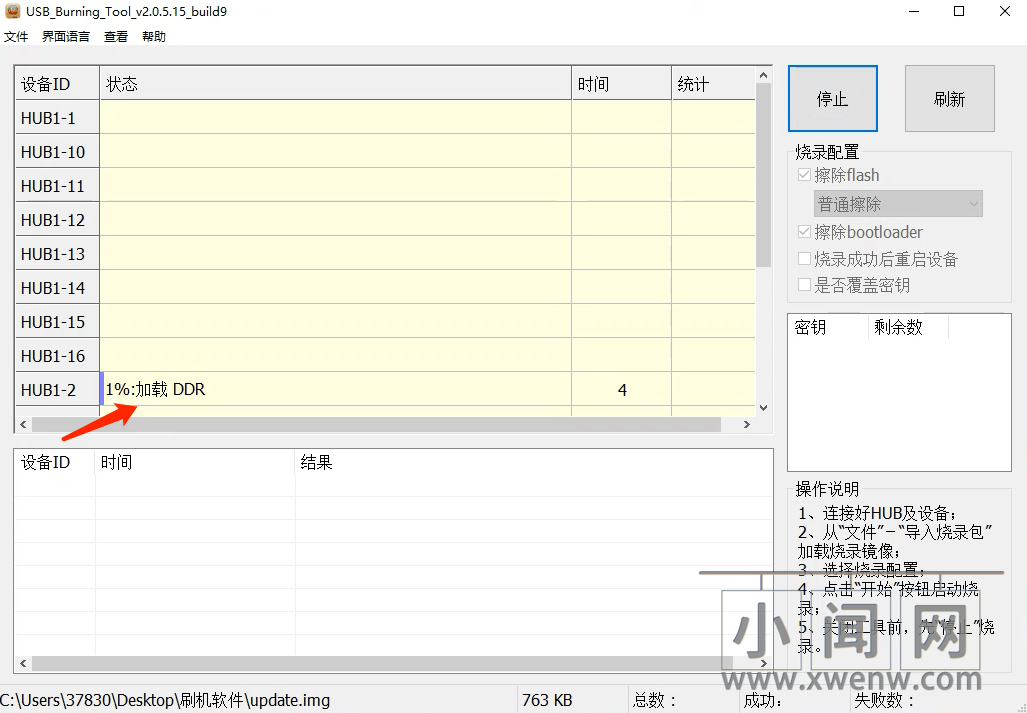
正常情况,会出现上图的一个线程,开始写入。如果有错误,换一个usb接口,多试几次。
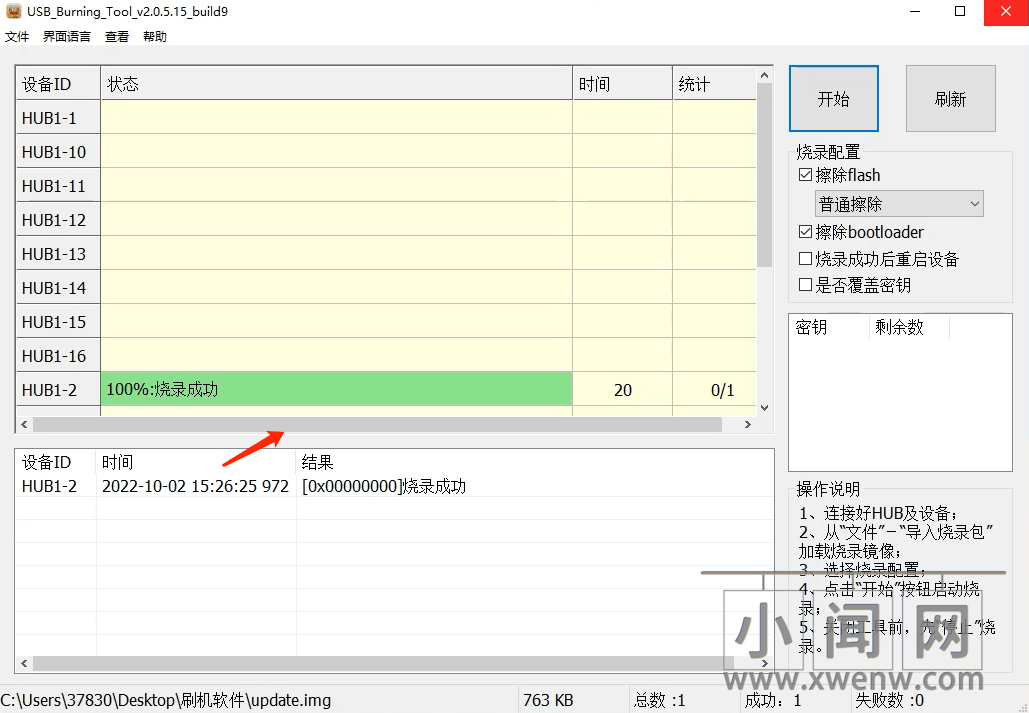
这个固件很小,很快就会写完,一般几秒钟,提示烧录成功后,先点”停止“,然后关闭,拔掉电源、拔掉USB。
第二步:玩客云刷入armbian5.9系统
这一步分为好几个部分:
- U盘写入armbian5.88系统
- armbian5.88写入玩客云EMMC
- U盘写入armbian5.9系统
- U盘启armbian5.9系统ssh登陆写入EMMC
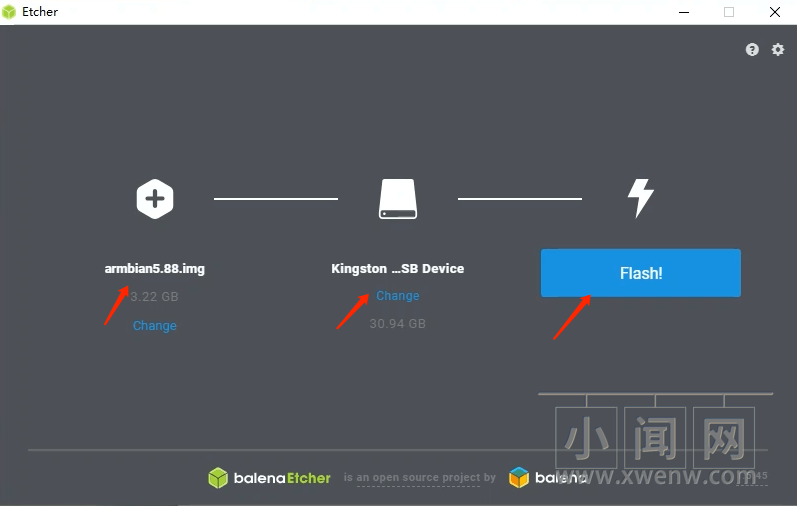
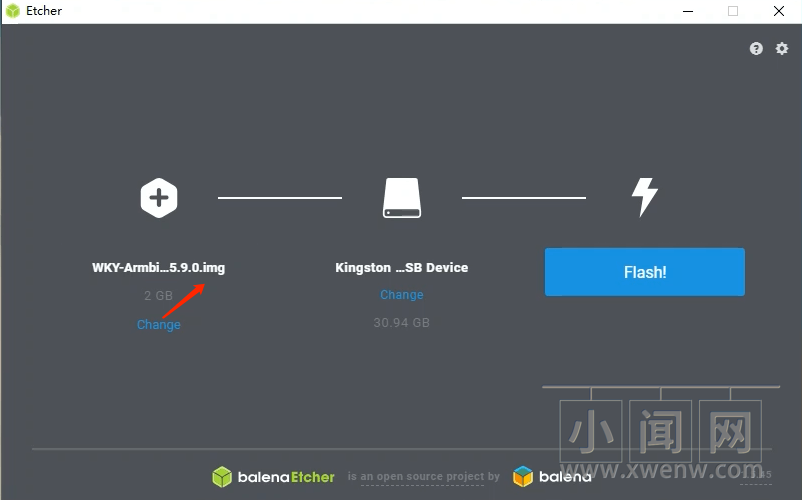
打开写入U盘镜像软件,选择镜像,确认U盘名称,点flash开始写入。
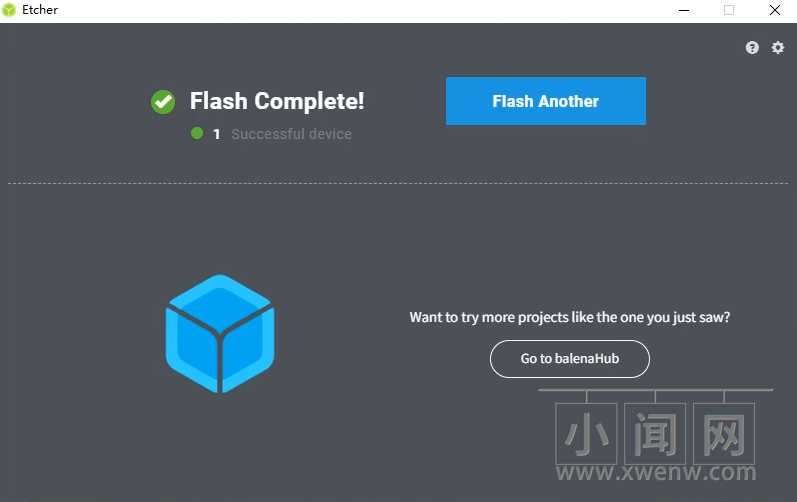
等待几分钟,写入速度和U盘传输速度有关,一般是几分钟,提示成功后,关闭软件,拔出U盘。
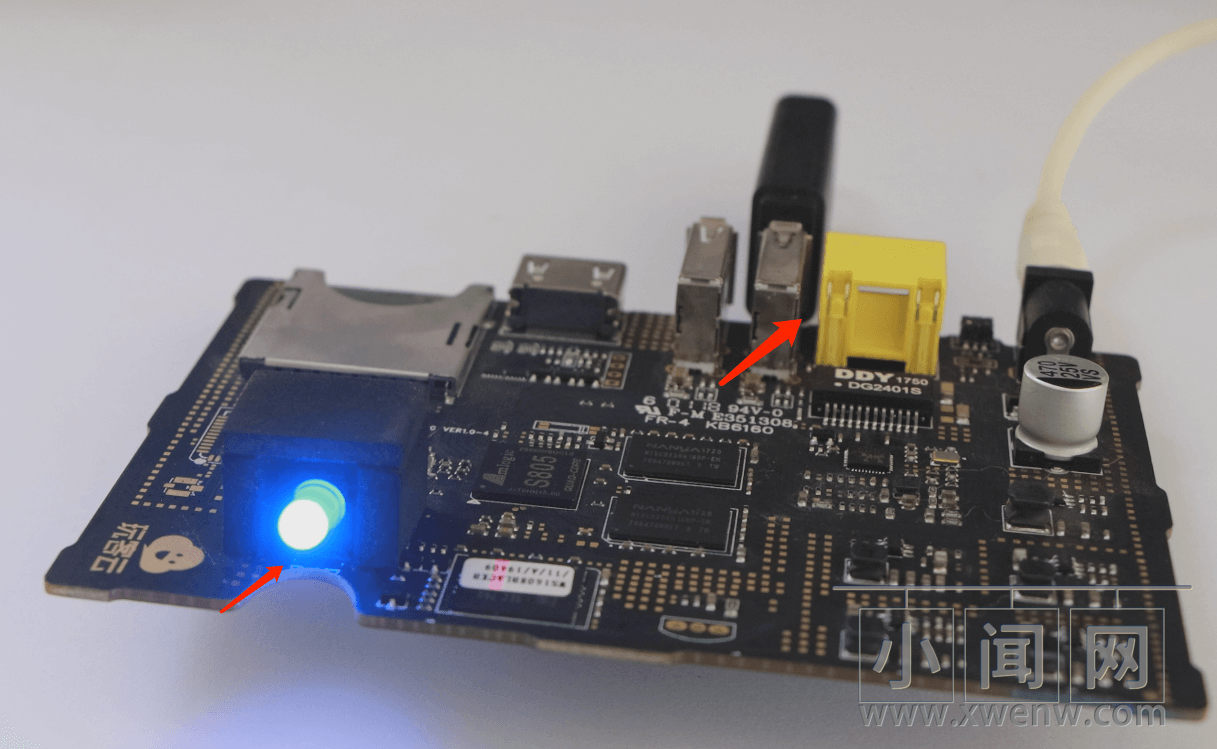
把U盘插入玩客云靠近网口的USB,然后通电,指示灯会蓝色→绿色→蓝紫闪烁→蓝色,证明刷机成功,过程好几分钟,多等下。
打开写入软件,选armbian5.9的镜像,写入U盘,过程比前面快一点,这个镜像小一些,同样步骤操作。armbian5.9系统写入完成后,把U盘插入玩客云靠近网口的USB,用网线接入路由器LAN口,通电开机。
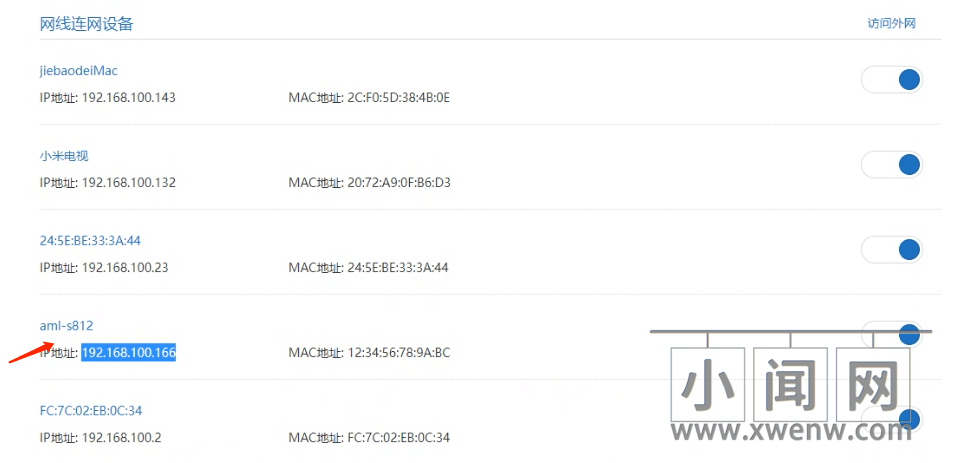
过一会打开路由器后台,找到”aml-s812“的设备IP地址,复制。
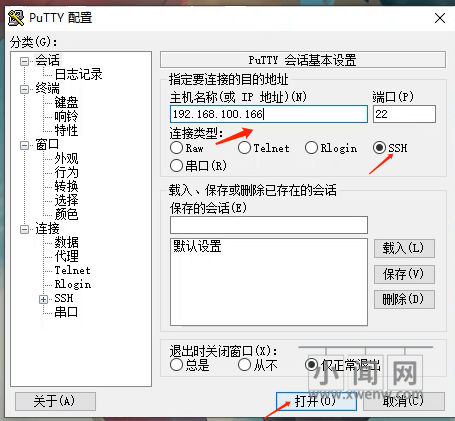
WIN10电脑打开putty软件,其他ssh工具也可以,填入上面的IP地址
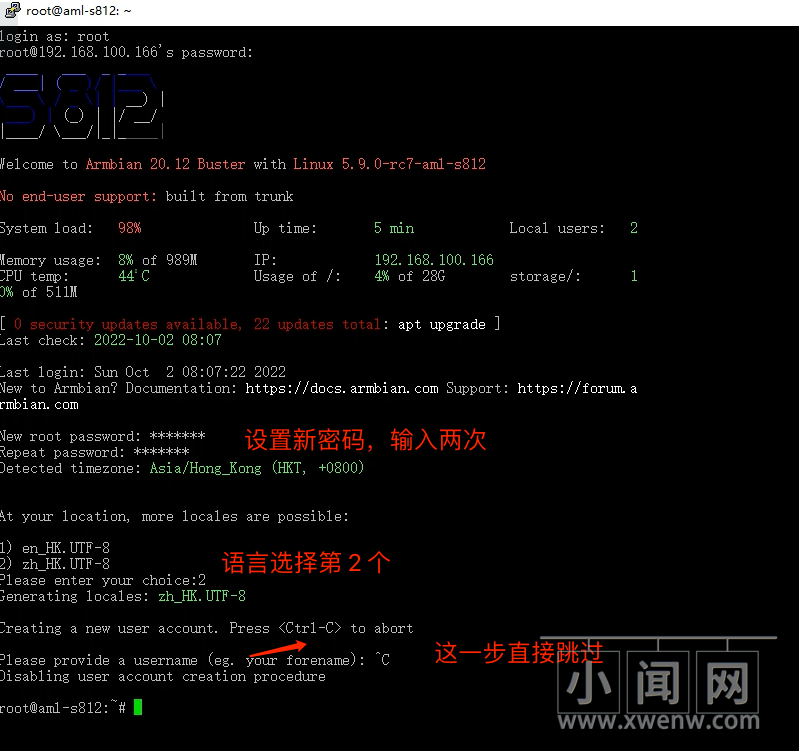
登陆,用户名:root 默认密码:1234
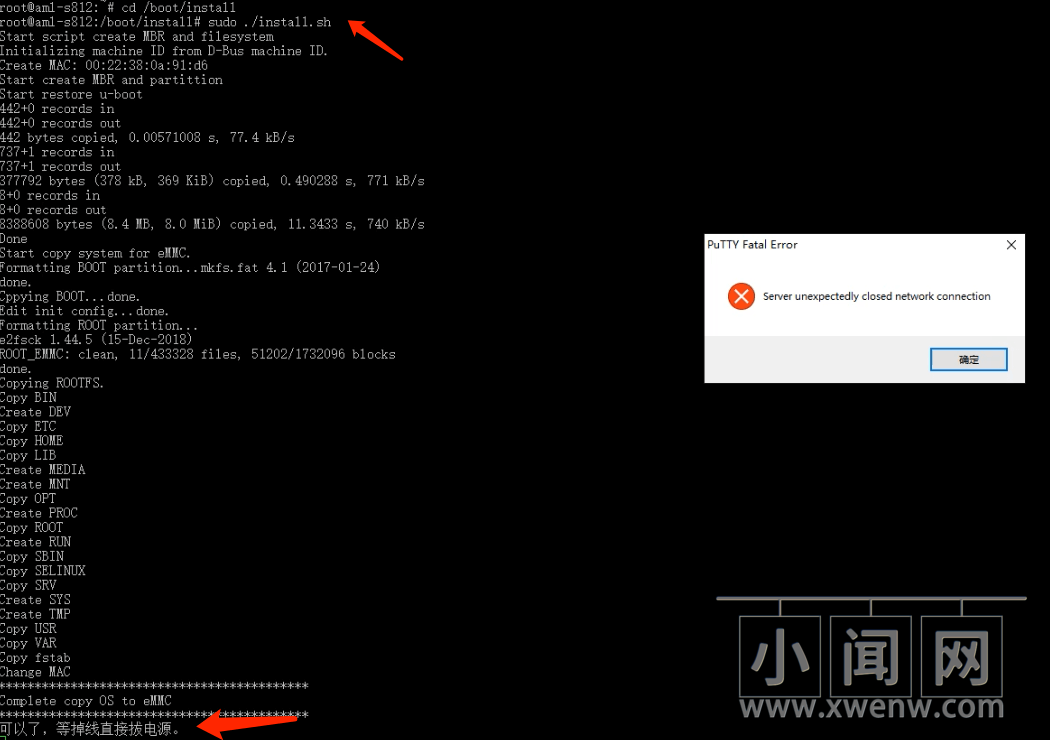
进入目录 cd /boot/install ,写入emmc命令,等待写入完成,耗时几分钟。
刷入 emmc命令:
cd /boot/install sudo ./install.sh
完成后,拔电源,拔掉U盘,终于ARMBIAN系统刷机完成。
第三步:docker环境搭建
国内网络连接不稳定,需要更换软件源,然后更新系统,之后才能安装docker。
「换Debian源」
mv /etc/apt/sources.list /etc/apt/sources.list.bk
nano /etc/apt/sources.list
进入编辑器后,粘贴下面代码
deb https://mirrors.ustc.edu.cn/debian/ bullseye main non-free contrib
deb-src https://mirrors.ustc.edu.cn/debian/ bullseye main non-free contrib
deb https://mirrors.ustc.edu.cn/debian-security/ bullseye-security main
deb-src https://mirrors.ustc.edu.cn/debian-security/ bullseye-security main
deb https://mirrors.ustc.edu.cn/debian/ bullseye-updates main non-free contrib
deb-src https://mirrors.ustc.edu.cn/debian/ bullseye-updates main non-free contrib
deb https://mirrors.ustc.edu.cn/debian/ bullseye-backports main non-free contrib
deb-src https://mirrors.ustc.edu.cn/debian/ bullseye-backports main non-free contrib
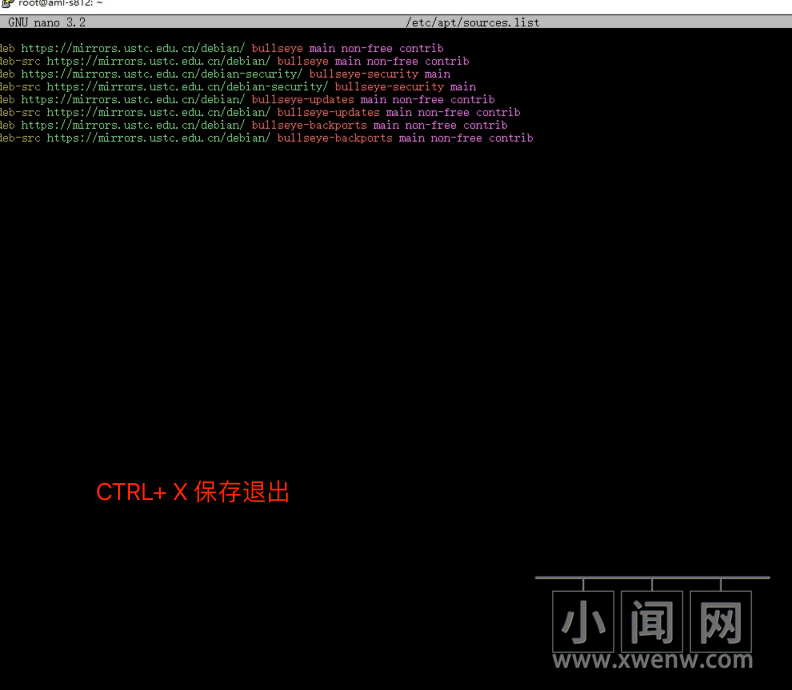
然后保存,退出。「更新软件」
apt-get update && apt-get upgrade
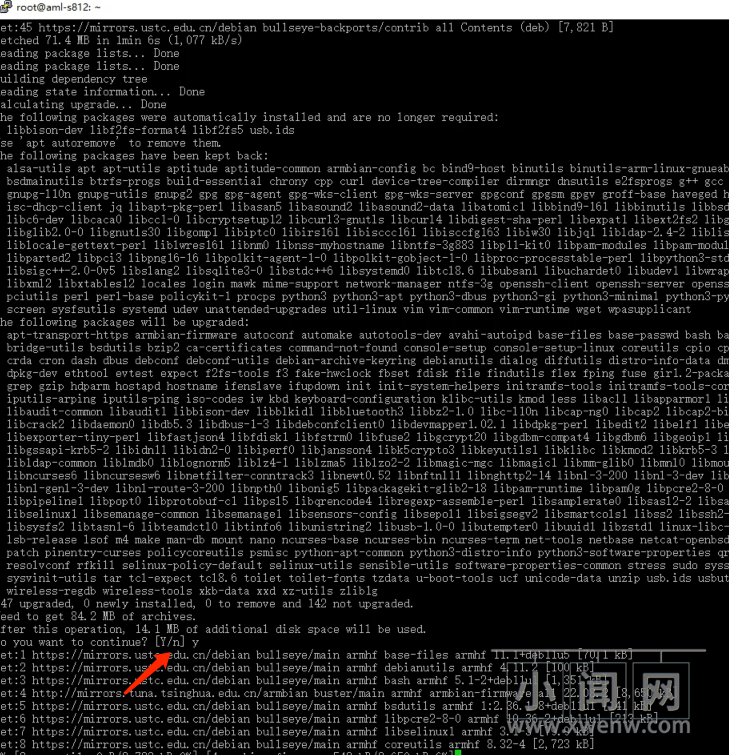
选择有Y就选Y,有默认的情况就选N
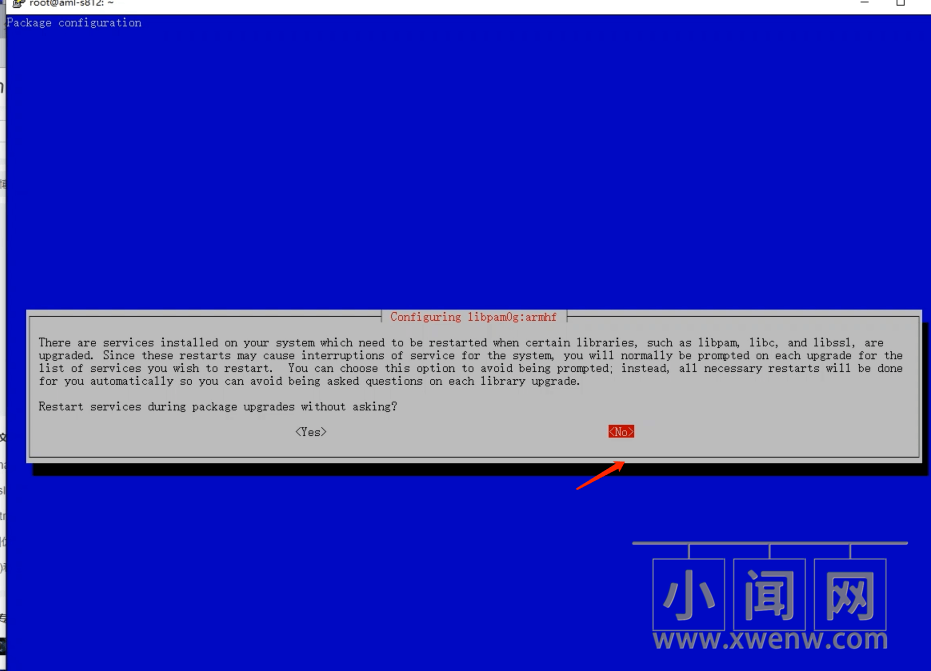
这里选择 NO「安装docker」
apt install docker.io
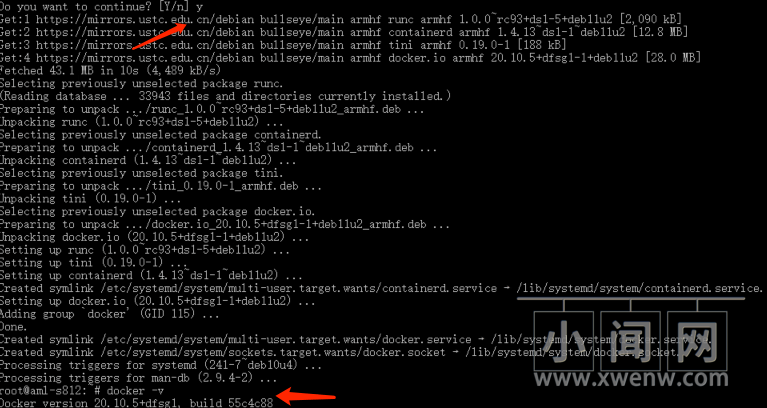
等待代码跑完后,docker -v 查看下版本,证明安装成功!
安装OpenWrt
镜像:https://hub.docker.com/r/xuanaimai/onecloud
本次安装的是镜像一,比较精简,功能够用;镜像二功能很全,根据自己需要选择。
「打开网卡混杂模式」
ip link set eth0 promisc on
「创建网络」
docker network create -d macvlan --subnet=192.168.100.0/24 --gateway=192.168.100.1 -o parent=eth0 macnet
自己根据 玩客云 所在网段修改,如:玩客云IP:192.168.1.175,则192.168.0.0/24 改成 192.168.1.0/24,192.168.0.1改成主路由地址
「拉取镜像」
docker pull jyhking/onecloud:1.1docker run -itd --name=OneCloud --restart=always --network=macnet --privileged=true jyhking/onecloud:1.1 /sbin/init
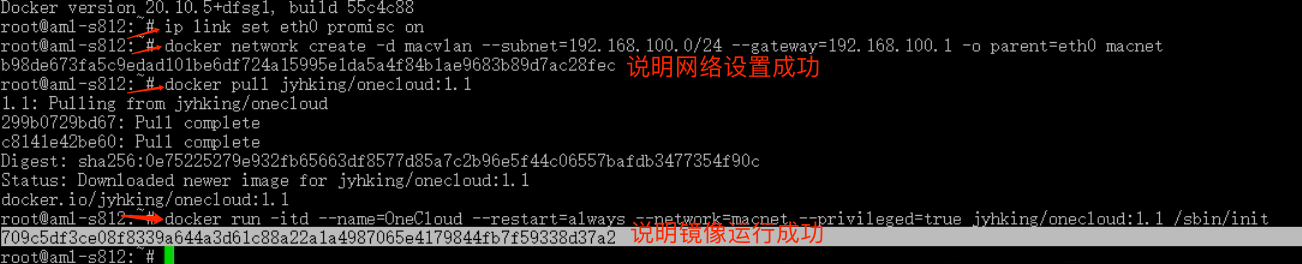
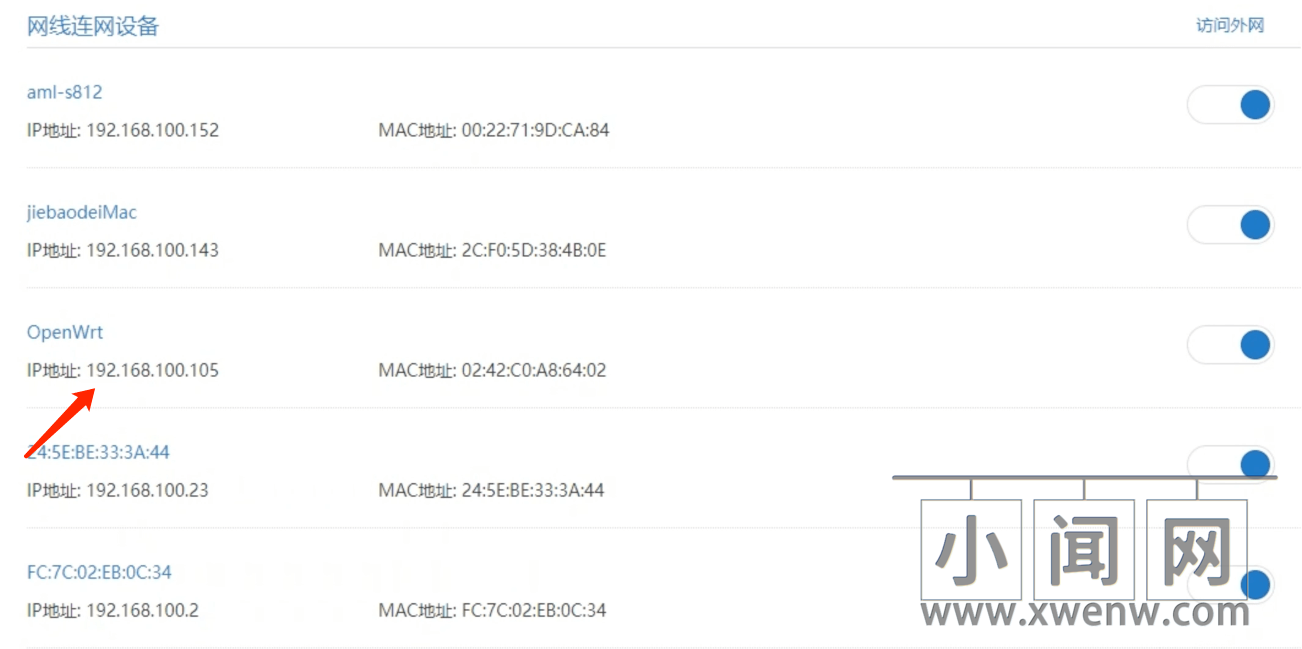
openwrt镜像运行成功,然后打开路由器后台,找到openwrt地址。
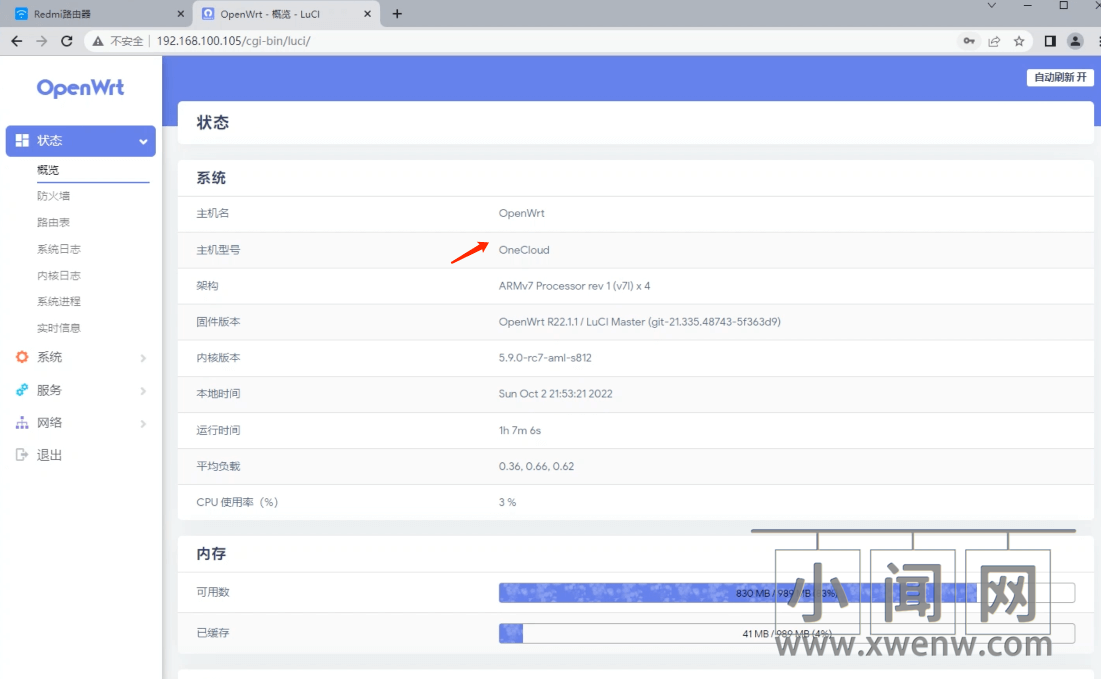
「用户名:root 密码: password」
「玩客云旁路由设置:」
- LAN口固定IP地址,网关指向主路由IP地址
- 关闭DHCP服务器
- 关闭IPV6
- 防火墙自定义规则添加下面代码
iptables -t nat -I POSTROUTING eth0 -j MASQUERADE
玩客云旁路由性能测试
「1、iperf3内网测速」
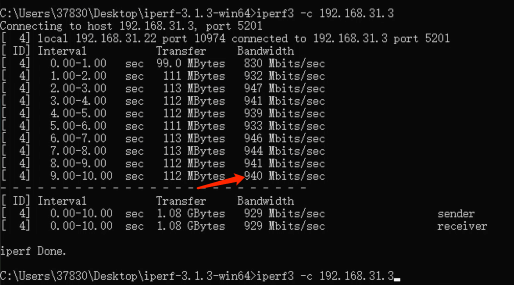
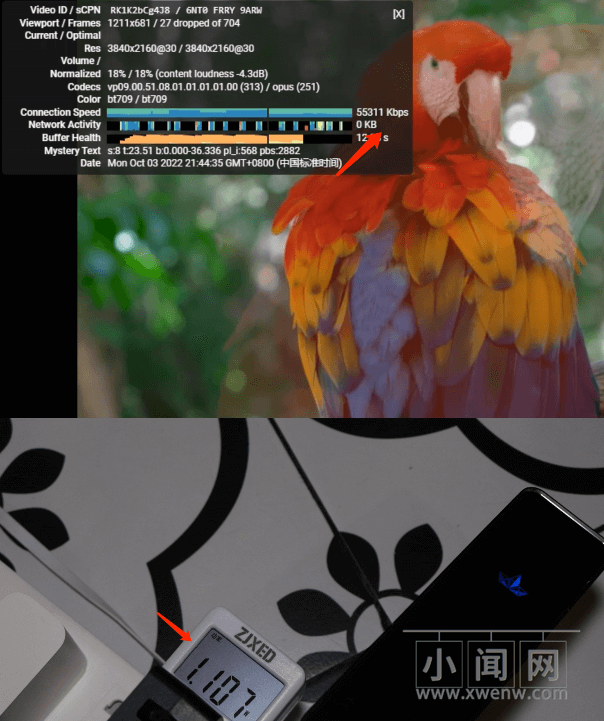
基本上在930Mbps上下,证明网口是千兆的,基本跑满了。「2、油管4K视频跑分测试」
稳定在5万多分,功耗1瓦多,CPU占用率在 40% 左右。「3、fast网速测试」
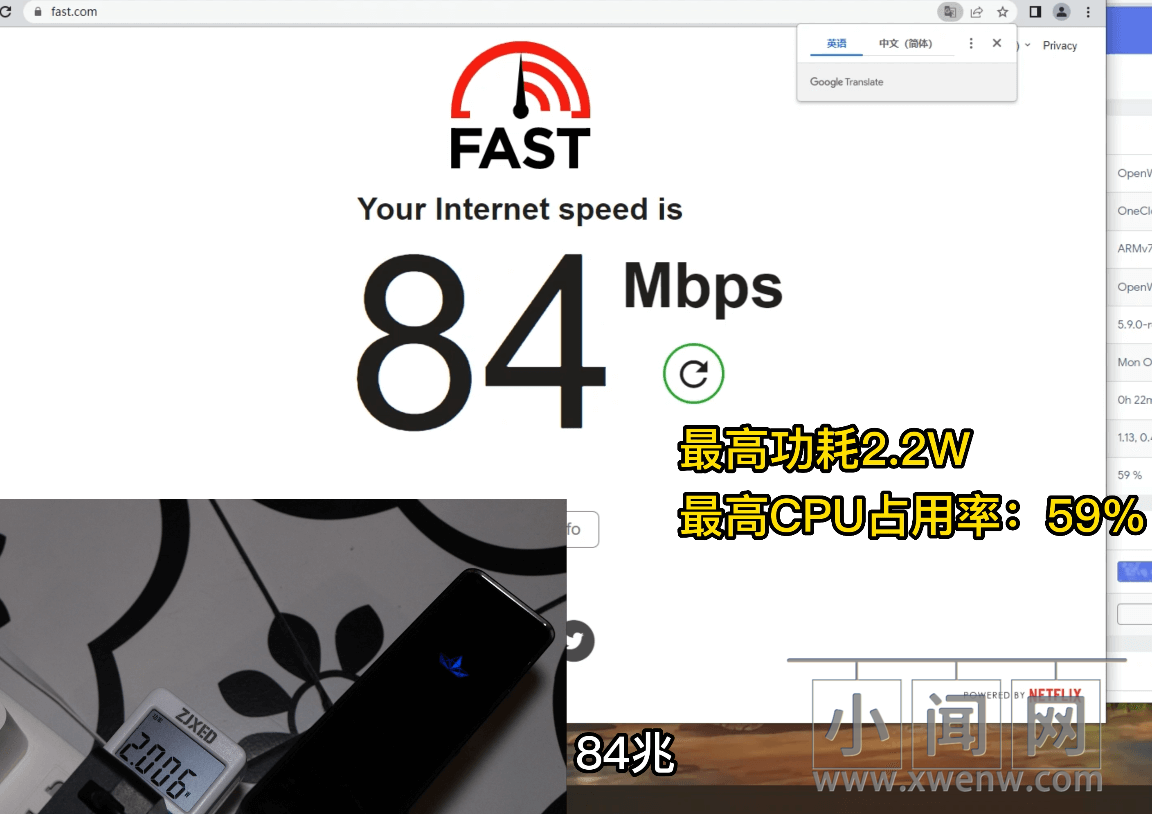
测了好几次,最低65Mbps,最高84Mbps,看4K视频完全够用了。
总结
价格低廉,40多块钱就能入手,千兆网口,可当旁路由使用,能满足100M带宽的科学上网,功耗极低,适合喜欢折腾的朋友。


评论(0)