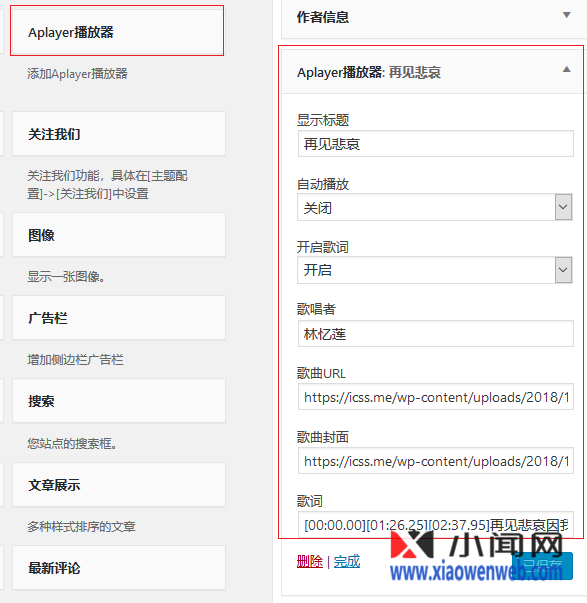
Aplayer的音乐播放器界面确实好看,所以决定也弄一个,最终整合到侧边栏的小工具上,这样方便在不同的地方调用不同的音乐
先看看效果图:
Aplayer.js
以下是制作widget小工具的全部代码,把以下代码存为:widget-aplayer.php
<?php
add_action('widgets_init', 'widgetaplayerInit');

function widgetaplayerInit() {
    register_widget('widgetaplayer');
}

class widgetaplayer extends WP_Widget {

    /**
     * widgetProfile setup
     */
    function widgetaplayer() {
        $widget_ops = array('classname' => 'widget-aplayer', 'description' => '添加Aplayer播放器');
        // init widgetProfile
        parent::__construct('widget-aplayer', "Aplayer播放器", $widget_ops);
    }

    /**
     * How to display the widgetProfile on the screen.
     */
    function widget( $args, $instance ) {
        extract( $args );
        /* Our variables from the widget settings. */
        $title = apply_filters('widget_name', $instance['title'] );
        $type = $instance['type'];
        $gs = $instance['gs'];
        $auto = $instance['auto'];
        $auto = $instance['auto'];
        $url = $instance['url'];
        $pic = $instance['pic'];
        $word = $instance['word'];
        echo $before_widget;
        echo $this->showWidget($title,$type,$gs, $auto, $url, $pic,$word);
        echo $after_widget;
    }

    /**
     * Update the widget settings.
     */
    function update( $new_instance, $old_instance ) {
        $instance = $old_instance;
        /* Strip tags for title and name to remove HTML (important for text inputs). */
        $instance['title'] = strip_tags( $new_instance['title'] );
        $instance['type'] = strip_tags( $new_instance['type'] );
        $instance['gs'] = strip_tags( $new_instance['gs'] );
        $instance['auto'] = strip_tags( $new_instance['auto'] );
        $instance['url'] = strip_tags( $new_instance['url'] );
        $instance['pic'] = strip_tags( $new_instance['pic'] );
        $instance['word'] = strip_tags( $new_instance['word'] );
        return $instance;
    }

    /**
     * Displays the widget settings controls on the widget panel.
     * Make use of the get_field_id() and get_field_name() function
     * when creating your form elements. This handles the confusing stuff.
     */
    function form( $instance ) {
        /* Set up some default widget settings. */
        $defaults = array(
            'title' => '',
            'type' => 'true',
            'gs' => 'true',
            'auto'  => '',
            'url'   => '',
            'pic'   => '',
            'word'  => ''
        );
        $instance = wp_parse_args( (array) $instance, $defaults ); ?>
        <!-- widget title: -->
        <p>
            <label for="<?php echo $this->get_field_id( 'title' ); ?>">显示标题</label>
            <input type="text" id="<?php echo $this->get_field_id( 'title' ); ?>" name="<?php echo $this->get_field_name( 'title' ); ?>" value="<?php echo $instance['title']; ?>" style="width:100%;" />
        </p>
        <p>
            <label for="<?php echo $this->get_field_id( 'type' ); ?>">自动播放</label>
            <select id="<?php echo $this->get_field_id( 'type' ); ?>" name="<?php echo $this->get_field_name( 'type' ); ?>" class="widefat" style="width:100%;">
                <option value="true" <?php if ( 'true' == $instance['type'] ) echo 'selected="selected"'; ?>>开启</option>
                <option value="false" <?php if ( 'false' == $instance['type'] ) echo 'selected="selected"'; ?>>关闭</option>
            </select>
        </p>
        <p>
            <label for="<?php echo $this->get_field_id( 'gs' );?>">开启歌词</label>
            <select id="<?php echo $this->get_field_id( 'gs' ); ?>" name="<?php echo $this->get_field_name( 'gs' ); ?>" class="widefat" style="width:100%;">
                <option value="true" <?php if ( 'true' == $instance['gs'] ) echo 'selected="selected"'; ?>>开启</option>
                <option value="false" <?php if ( 'false' == $instance['gs'] ) echo 'selected="selected"'; ?>>关闭</option>
            </select>
        </p>
        <p>
            <label for="<?php echo $this->get_field_id( 'auto' ); ?>">歌唱者</label>
            <input type="text" id="<?php echo $this->get_field_id( 'auto' ); ?>" name="<?php echo $this->get_field_name( 'auto' ); ?>" value="<?php echo $instance['auto']; ?>" style="width:100%;" />
        </p>
        <p>
            <label for="<?php echo $this->get_field_id( 'url' ); ?>">歌曲URL</label>
            <input type="text" id="<?php echo $this->get_field_id( 'url' ); ?>" name="<?php echo $this->get_field_name( 'url' ); ?>" value="<?php echo $instance['url']; ?>" style="width:100%;" />
        </p>
        <p>
            <label for="<?php echo $this->get_field_id( 'pic' ); ?>">歌曲封面</label>
            <input type="text" id="<?php echo $this->get_field_id( 'pic' ); ?>" name="<?php echo $this->get_field_name( 'pic' ); ?>" value="<?php echo $instance['pic']; ?>" style="width:100%;" />
        </p>
        <p>
            <label for="<?php echo $this->get_field_id( 'word' ); ?>">歌词</label>
            <input type="text" id="<?php echo $this->get_field_id( 'word' ); ?>" name="<?php echo $this->get_field_name( 'word' ); ?>" style="width:100%;" value="<?php echo $instance['word']; ?>" />
        </p>
        <?php
    }

    function showWidget($title,$type,$gs, $auto, $url, $pic, $word) {
        ?>
    <link href="<?php echo get_template_directory_uri().'/aplayer/APlayer.min.css'?>" rel="stylesheet">
    <script src="<?php echo get_template_directory_uri().'/aplayer/APlayer.min.js'?>"></script>
    <div class="widget-title"><?php echo $title ?></div>
        <div id="player1">
            <pre class="aplayer-lrc-content">
                <?php echo $word ?>
            </pre>
        </div>
    <script>
        var ap = new APlayer
                ({
                    element: document.getElementById('player1'),
                    narrow: false,
                    autoplay: <?php echo $type ?>,
                    showlrc: <?php echo $gs ?>,
                    music: {
                            title: '<?php echo $title ?>',
                            author: '<?php echo $auto ?>',
                            url: '<?php echo $url ?>',
                            pic: '<?php echo $pic ?>'
                            }
                });
        ap.init();
    </script>
    <?php }
}?>
其中这二句是引用了Aplayer的JS与CSS
<link href="<?php echo get_template_directory_uri().'/aplayer/APlayer.min.css'?>" rel="stylesheet">
<script src="<?php echo get_template_directory_uri().'/aplayer/APlayer.min.js'?>"></script>
这二句我是放在我的主题文件夹下的,你也可以直接引用官方的Aplayer的js与css
最后在function.php引用这个文件:widget-aplayer.php
include(TEMPLATEPATH.’/template-parts/widget/widget-aplayer.php’);
在后台外观-小工具中选择Aplayer播放器

这样一个小工具就做好了,可以放在侧边栏的任何位置,目前在设置歌曲的URL与封面时,都是手动粘地址,好想直接多媒体库中添加多好,暂时还不会怎么关联媒体库,有知道的肯请粘上代码。
声明:本站所有文章,如无特殊说明或标注,均为本站原创发布。任何个人或组织,在未征得本站同意时,禁止复制、盗用、采集、发布本站内容到任何网站、书籍等各类媒体平台。如若本站内容侵犯了原著者的合法权益,可联系我们进行处理。


评论(0)